Razorpay in Nextjs 15 the no BS way.
Learn how to implement Razorpay API for payments in your projects.

Table of Contents
Intro
We're going to implement Razorpay API for payments in your Nextjs 15 project. Razorpay is a payment gateway that allows you to accept payments from customers. It is a popular payment gateway in India and is used by many businesses to accept payments online. In this guide, we'll walk you through the process of integrating Razorpay API into your Nextjs 15 project.
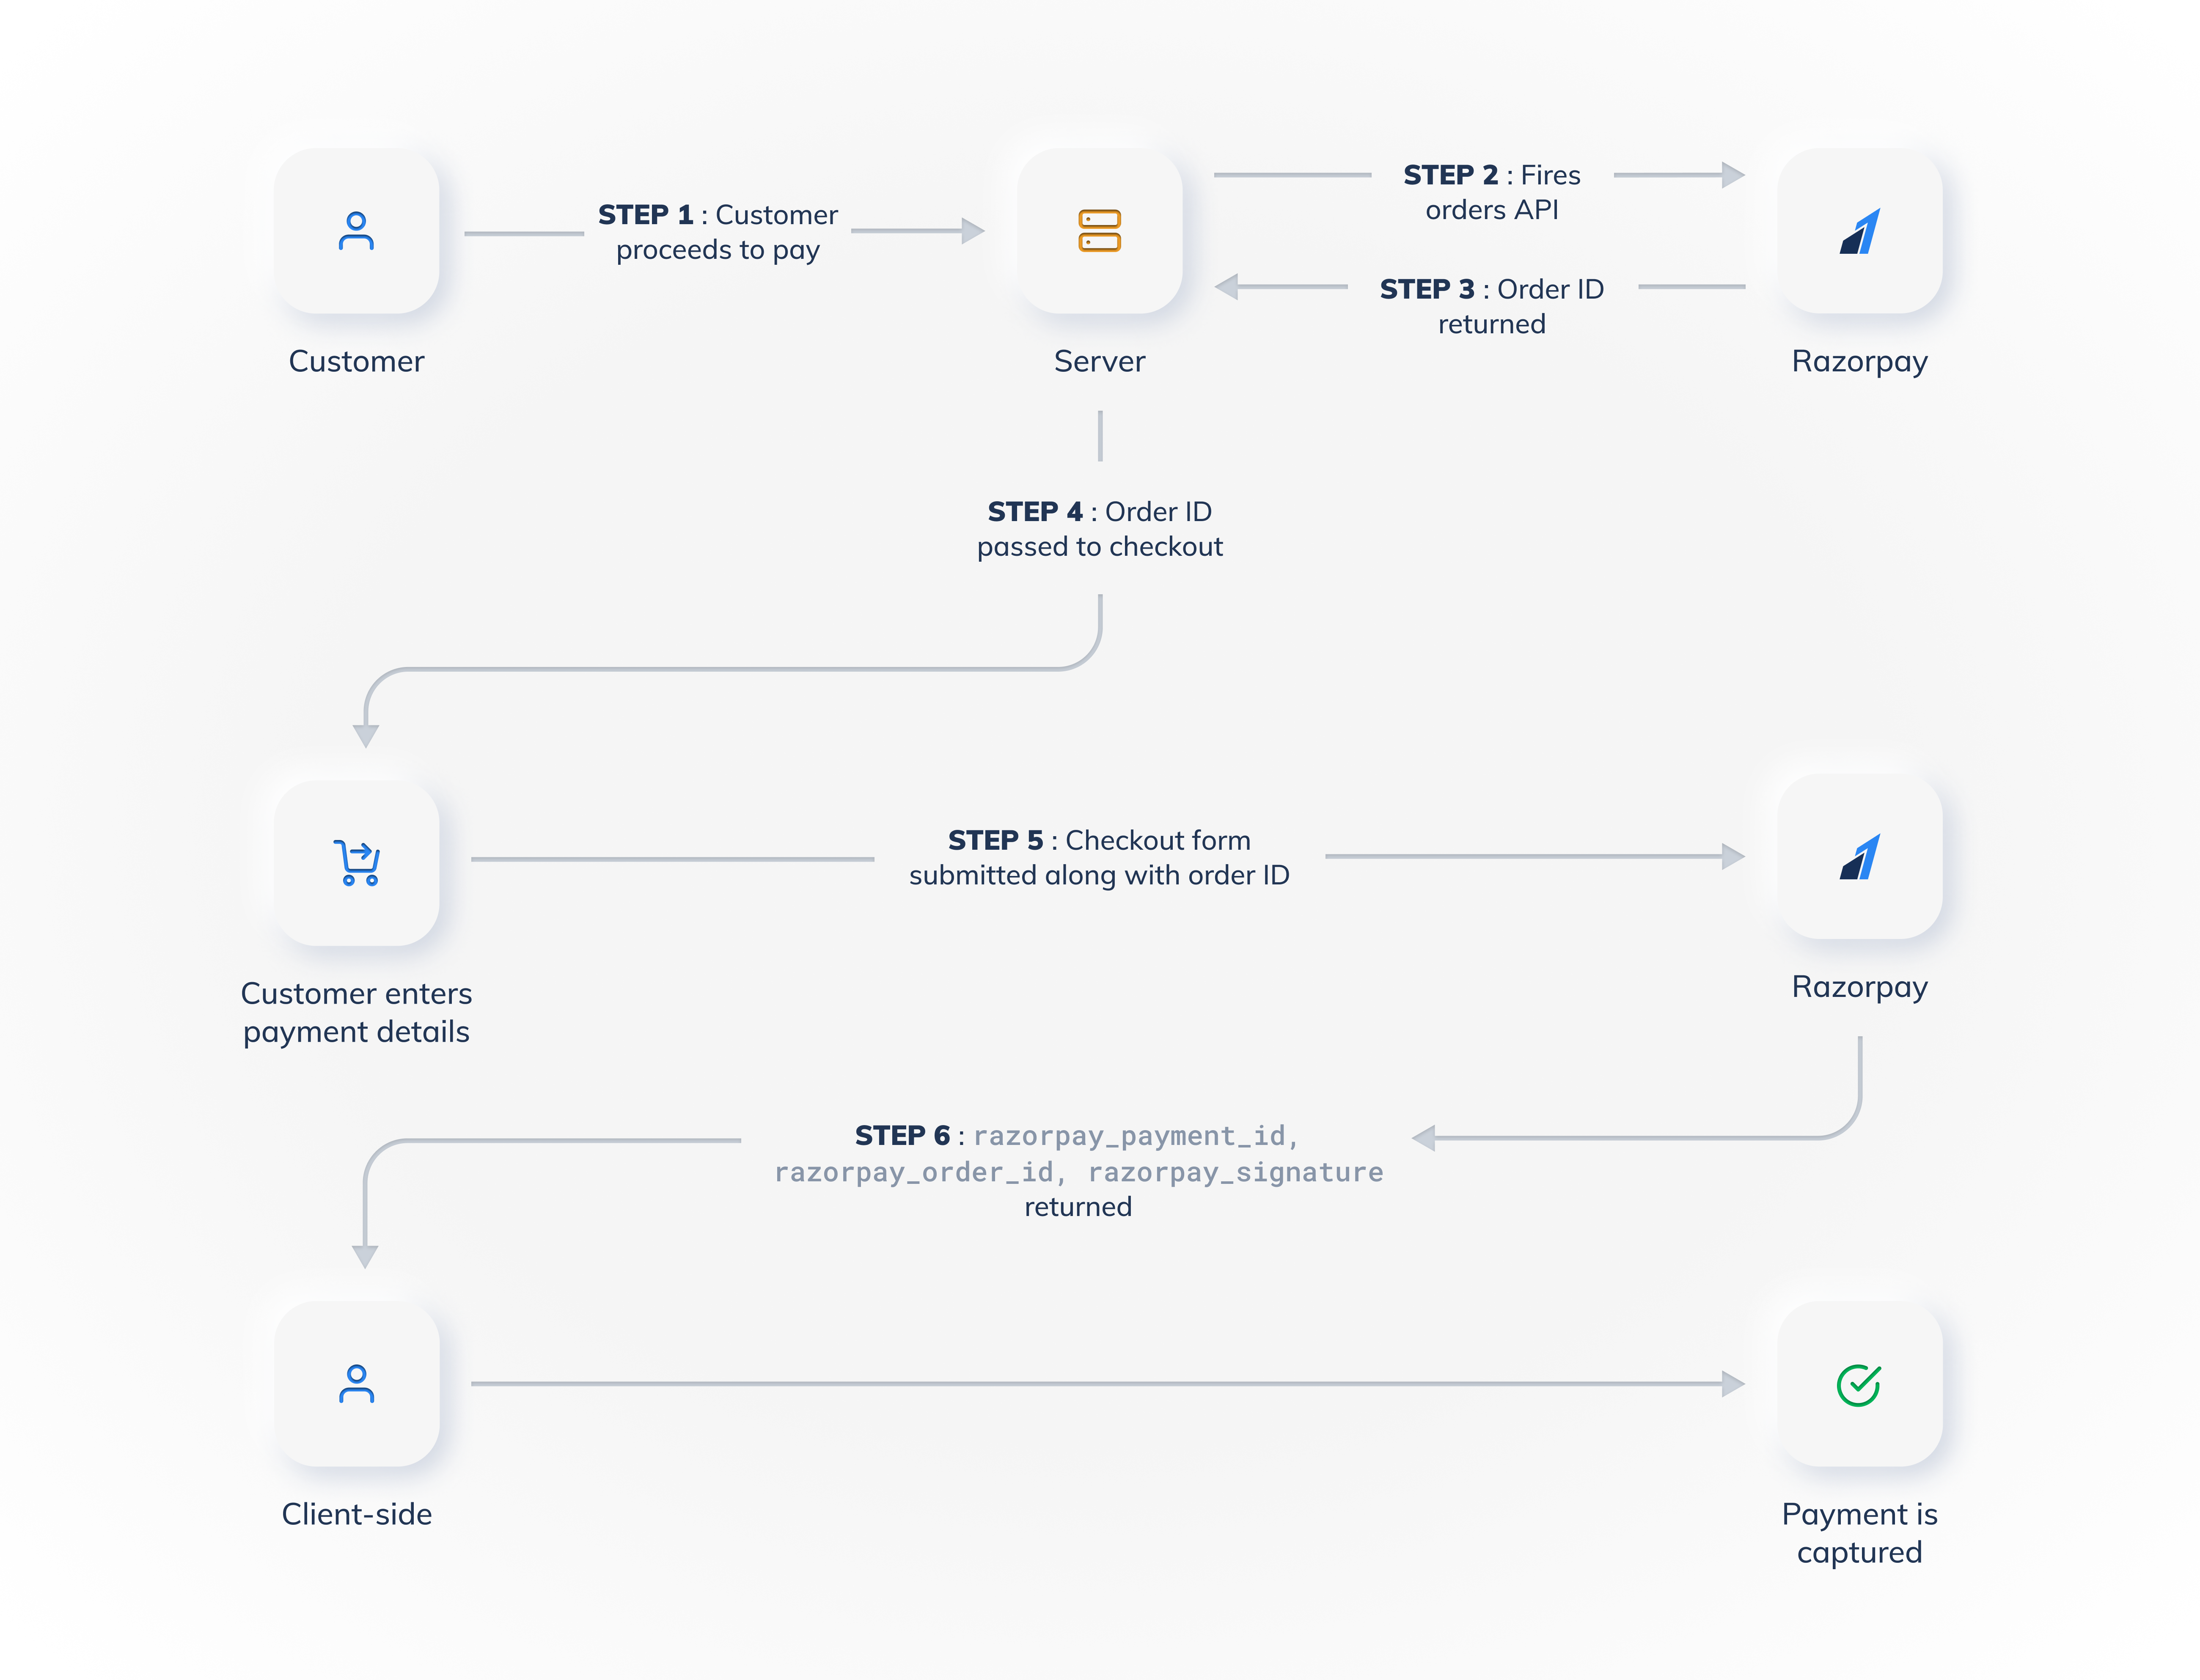
How it works

Steps
STEP 1 : Installation and Setup
Create a Razorpay account and get your API keys. And install the Razorpay package in your project.
pnpm i razorpay
Step 2 : Frontend Implementation
create a file that interacts with client side code in to initiate the payment process. We've made sure for
- creating an order
- verifying the payment
- handling errors and giving back the feedback to user as a toast
- redirecting the user to a success page after successful payment
"use client";
import { useState } from "react";
import Script from "next/script";
import { toast } from "sonner";
import { Button } from "./ui/button";
import { useRouter } from "next/navigation";

interface RazorpayResponse {
  razorpay_payment_id: string;
  razorpay_order_id: string;
  razorpay_signature: string;
}

interface VerificationData {
  orderCreationId: string;
  razorpayPaymentId: string;
  razorpayOrderId: string;
  razorpaySignature: string;
}

const CheckoutWithRazorpay: React.FC = () => {
  const [loading, setLoading] = useState(false);
  const router = useRouter();

  const createOrderId = async (amount: number): Promise<string> => {
    try {
      const response = await fetch("/api/order", {
        method: "POST",
        headers: { "Content-Type": "application/json" },
        body: JSON.stringify({ amount: amount * 100 }),
      });

      if (!response.ok) {
        throw new Error("Failed to create Razorpay order ID");
      }

      const data = await response.json();
      return data.orderId;
    } catch (error) {
      console.error("Error creating order ID:", error);
      toast.error("Failed to initiate checkout. Please try again.");
      throw error;
    }
  };

  // verify the payment with the server
  const verifyPayment = async (data: VerificationData): Promise<boolean> => {
    try {
      const response = await fetch("/api/verify", {
        method: "POST",
        headers: { "Content-Type": "application/json" },
        body: JSON.stringify(data),
      });

      if (!response.ok) {
        throw new Error("Payment verification failed");
      }

      const result = await response.json();
      return result.isOk;
    } catch (error) {
      console.error("Error verifying payment:", error);
      toast.error("Payment verification failed. Please contact support.");
      return false;
    }
  };

  // take in amound and handle the payment process
  const handlePayment = async ({ amount }: { amount: number }) => {
    setLoading(true);

    try {
      const orderId = await createOrderId(amount);

      const options = {
        key: process.env.NEXT_PUBLIC_RAZORPAY_KEY_ID,
        amount: amount * 100,
        currency: "INR",
        name: "UnicornSpace",
        description: "Product Purchase",
        order_id: orderId,
        handler: async (response: RazorpayResponse) => {
          const verificationData: VerificationData = {
            orderCreationId: orderId,
            razorpayPaymentId: response.razorpay_payment_id,
            razorpayOrderId: response.razorpay_order_id,
            razorpaySignature: response.razorpay_signature,
          };

          const isVerified = await verifyPayment(verificationData);

          if (isVerified) {
            toast.success("Payment successful!");
            router.push("/success");
          } else {
            toast.error("Payment verification failed. Please contact support.");
          }
        },
        prefill: {
          name: "User paying🔥",
          email: "customer@example.com",
          address: "",
        },
        notes: {
          address: "lafl;jsdflkj",
          addres2: "lafl;jsdflkj",
        },
        theme: {
          color: "#FAFAF1",
        },
      };

      const paymentObject = new (window as any).Razorpay(options);
      paymentObject.on("payment.failed", (response: any) => {
        toast.error(`Payment failed: ${response.error.description}`);
      });
      paymentObject.open();
    } catch (error) {
      console.error("Checkout error:", error);
      toast.error("Checkout failed. Please try again.");
    } finally {
      setLoading(false);
    }
  };

  return (
    <>
    {%this file will help you create the popup for payments%}
      <Script
        id="razorpay-checkout-js"
        src="https://checkout.razorpay.com/v1/checkout.js"
      />

      <Button
        onClick={async () => {
          await handlePayment({ amount: 100 });
        }}
      >
        Subscribe
      </Button>
    </>
  );
};

export default CheckoutWithRazorpay;
Step 3 : Backend Implementation (API Routes)
We're writing serverside code to interact with Razorpay backend to process payments. Create the files in @/src/app/api/verify/route.ts and @/src/app/api/order/route.ts to handle the payment verification and order creation.
The below code basically does the following:
- Verify the order and payment signature with your Razorpay API
- this will help you to verify the payment and create the order
NOTE: Make sure the STEP 3 is implemented in backend only as it contains sensitive information and should not be exposed to the client.
import { NextRequest, NextResponse } from "next/server";
import crypto from "crypto";

const generatedSignature = (
  razorpayOrderId: string,
  razorpayPaymentId: string
) => {
  const keySecret = process.env.RAZORPAY_KEY_SECRET;
  if (!keySecret) {
    throw new Error(
      "Razorpay key secret is not defined in environment variables."
    );
  }
  const sig = crypto
    .createHmac("sha256", keySecret)
    .update(razorpayOrderId + "|" + razorpayPaymentId)
    .digest("hex");
  return sig;
};

export async function POST(request: NextRequest) {
  const { orderCreationId, razorpayPaymentId, razorpaySignature } =
    await request.json();

  const signature = generatedSignature(orderCreationId, razorpayPaymentId);
  if (signature !== razorpaySignature) {
    return NextResponse.json(
      { message: "payment verification failed", isOk: false },
      { status: 400 }
    );
  }
  return NextResponse.json(
    { message: "payment verified successfully", isOk: true },
    { status: 200 }
  );
}
Code to that actually creates the order in Razorpay backend.
import Razorpay from "razorpay";
import { NextRequest, NextResponse } from "next/server";

const razorpay = new Razorpay({
  key_id: process.env.RAZORPAY_KEY_ID!,
  key_secret: process.env.RAZORPAY_KEY_SECRET,
});

export async function POST(request: NextRequest) {
  const { amount, currency } = (await request.json()) as {
    amount: string;
    currency: string;
  };

  var options = {
    amount: amount,
    currency: currency,
    receipt: "rcp1",
  };
  const order = await razorpay.orders.create(options);
  console.log(order);
  return NextResponse.json({ orderId: order.id }, { status: 200 });
}
Step 4 : Environment Variables
create a .env file in the root of your project and add the following environment variables. You'll basically recieve these keys from your Razorpay dashboard.
RAZORPAY_KEY_ID=""
RAZORPAY_KEY_SECRET=""